
TL;DR
Moving your rig into a closet can drastically cut noise by putting distance between the source and you. Proper placement, ventilation, and targeted acoustic treatment make tiny spaces functional for recording without deadening sound or trapping heat. It’s about smart strategies, not just materials.
Ever tried working in a tiny closet and felt like your voice echoes like you’re in a cave? Or maybe your noisy rig keeps your partner awake at night? The good news: you don’t need a soundproof studio to get professional results. Sometimes, the simplest change—like where you place your gear—makes the biggest difference.
This guide cuts through the noise and hyperbole, showing you how to make your closet a quiet, efficient workspace. Whether you want to tame reflections, prevent heat buildup, or just stop sound leaks, I’ll walk you through proven strategies that turn a cramped space into a clever solution.
Acoustic dampening
& the rig in the closet.
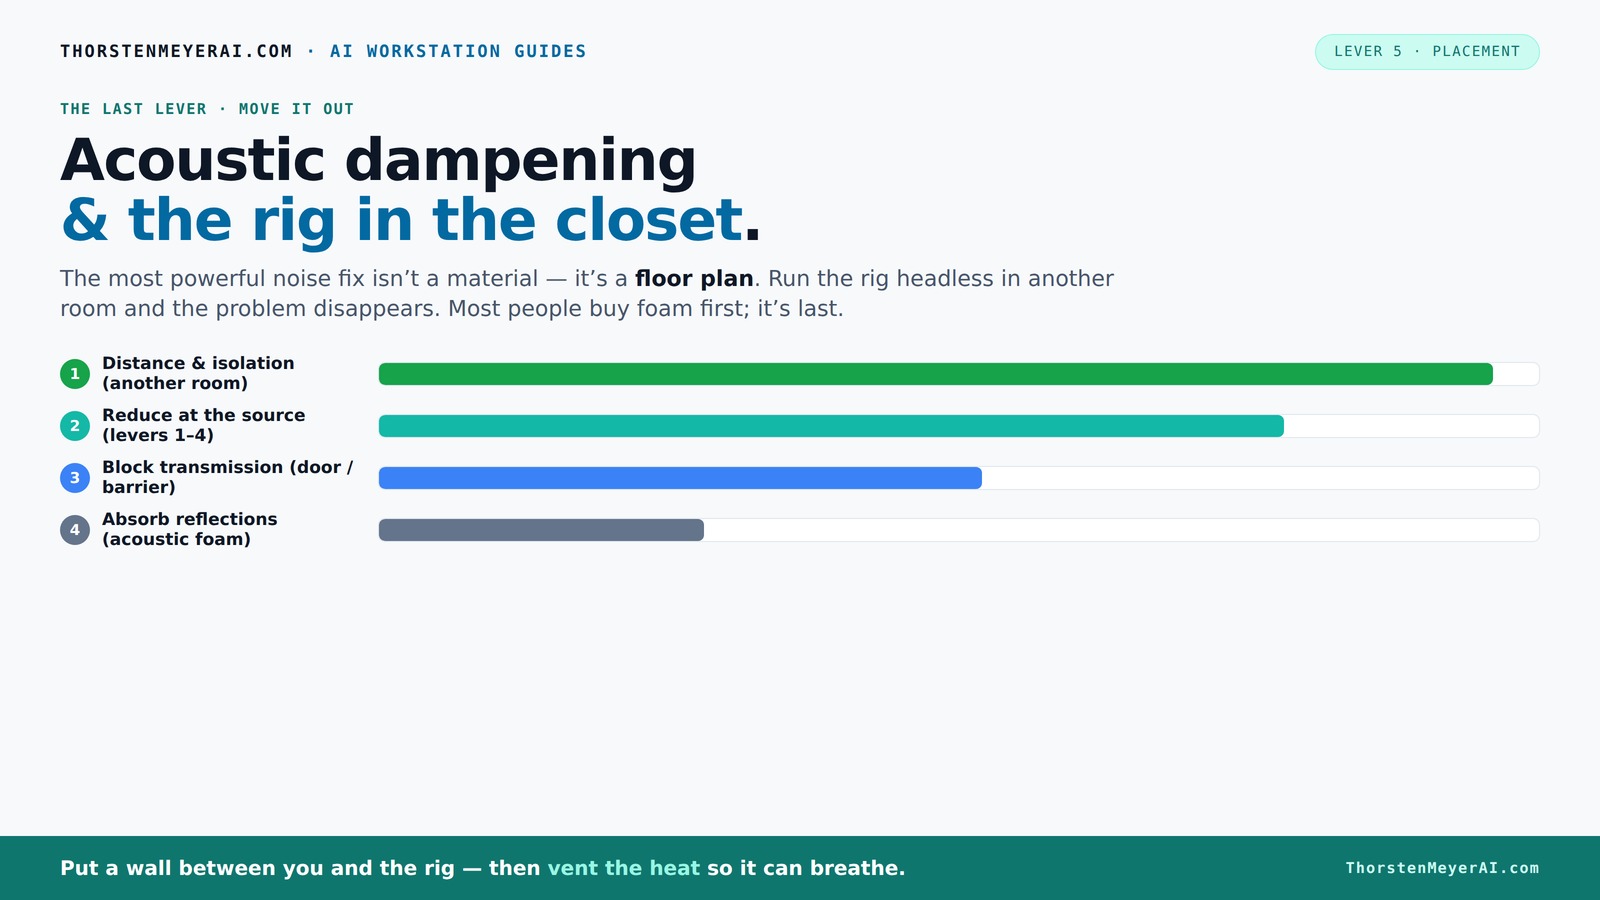
The most powerful noise fix isn’t a material — it’s a floor plan. A rig you can’t hear because it’s in another room beats any amount of foam. Tap the approaches in Part 1 to see what actually works.
(another room)
(levers 1–4)
(door / barrier)
(acoustic foam)
Contain the noise, not the heat
Key Takeaways
- Moving your rig into a separate room or closet is the most effective way to eliminate noise at its source.
- Proper ventilation is critical in sealed or enclosed closet setups to prevent overheating and maintain performance.
- Focus on reflection points—walls, ceiling, and the area behind the mic—for more effective acoustic treatment than just filling corners.
- Seal gaps around doors and vents meticulously to prevent sound leaks and improve isolation.
- Combine DIY materials like blankets and rugs with strategic placement to improve sound quality without overdoing it.

Focusound 52 Pack Acoustic Foam Panels 1" x 12" x 12" Sound Proof Foam Panles Soundproofing Noise Cancelling Wedge Panels for Home Office Recoding Studio with 300PCS Double-Side Adhesive
Soundproofing - Acoustic foam panels triangular grooves structure for better noise absorption, helps to reduce and absorb unwanted...
As an affiliate, we earn on qualifying purchases.
As an affiliate, we earn on qualifying purchases.
Why Moving Your Rig Is the Biggest Noise Fix You Can Do
If you want to cut noise, distance is king. Putting your noisy computer or GPU tower in another room—like a closet or basement—means you won’t hear it at all. And since most AI work is done remotely or over a network, your physical proximity doesn’t matter much anymore.
Imagine your rig roaring in the next room, while your workspace stays silent. That’s the power of strategic placement. Plus, with a wired connection or strong Wi-Fi, you can control everything remotely. No more noisy fans filling your room with sound, and no need for expensive soundproof walls.
This approach works especially well in shared spaces or small apartments where soundproofing isn’t practical. It’s the quickest, cheapest way to silence your rig without sacrificing performance.

VEVOR Portable Vocal Booth, 6.56 ft Height, Portable Recording Studio with Travel Bag, Mobile Tablet Stand, Thickened Soundproofing, Sound Isolation Booth for Echo-Free Vocals, Podcasts, Voiceovers
Say Goodbye to Echoes: Built with durable Oxford cloth and acoustic padding, this recording booth for the home...
As an affiliate, we earn on qualifying purchases.
As an affiliate, we earn on qualifying purchases.
The "Rig in the Closet" Setup: How to Do It Right and Avoid Overheating
Placing a hot, power-hungry machine in a closet sounds perfect for noise—until it overheats. Closed spaces trap heat, turning your quiet rig into a sauna that throttles performance. The trick? Make sure your closet has proper airflow.
One common solution: install passive vents or small exhaust fans that draw hot air out and bring in cooler air. You could also use purpose-built, soundproof cabinets with ducted airflow—these are designed to keep things cool while muffling noise. Just remember: sealed spaces need active ventilation.
For example, if your GPU is running at 75°C during heavy loads, trapping that heat in a sealed closet will push that number even higher. Instead, set up a small fan or vent to keep the air moving. For more detailed advice, check out this guide on reducing heat and noise together.

50 Pack Acoustic Foam Panels,2"X 12" X 12"Sound Proof Foam PanelsHigh Density Sound Absorbing Panels,Soundproof Wedges Panels for Studio Recording & Office & Home
【Professional Sound Absorbing Properties】Acoustic foams are installed to reduce noise pollution as they remove echoes and background sounds....
As an affiliate, we earn on qualifying purchases.
As an affiliate, we earn on qualifying purchases.
Acoustic Dampening vs. Soundproofing: What’s the Real Difference?
Acoustic dampening is about softening echoes and reflections inside your space, not stopping sound from leaving. Soundproofing, on the other hand, means preventing sound from escaping into other rooms or outside.
In a tiny closet, you want both. Use foam, blankets, or rugs to absorb reflections and make your recordings clearer. But sealing gaps around the door or installing a solid barrier is what keeps noise from leaking out.
Understanding this distinction is crucial because it influences your approach. Dampening materials improve the clarity and quality of your sound by reducing internal echoes, which can make recordings sound muddy or distant. Soundproofing, however, requires more substantial modifications—like sealing gaps or adding mass—to prevent sound from disturbing others or being heard outside. Balancing both ensures your recordings are clean and your space remains discreet.

Weather Stripping Door Seal Strip - Soundproof Q-Shaped Foam for Exterior Door Frame, Large Gap Seal, Noise Cancelling, Easy to Install (Black, 26FT)
No light penetration: Our door seals are made of high-density foam core material, which effectively blocks light from...
As an affiliate, we earn on qualifying purchases.
As an affiliate, we earn on qualifying purchases.
Where to Place Acoustic Panels for the Best Voice Recordings
Place acoustic treatment at the main reflection points. For a microphone, that’s usually the wall behind you, the side walls, and the ceiling. Think of these as the spots where sound bounces the most and creates echoes.
To find these spots, sit in your recording position and have someone move a mirror along the walls. Wherever you see the microphone in the mirror, place panels there. In a small closet, this might mean adding foam on the ceiling and behind the mic as well.
Proper placement is essential because it targets the primary sources of unwanted reflections that color your recordings. By absorbing or diffusing sound at these critical points, you prevent early reflections from reaching your microphone, resulting in clearer, more focused vocal recordings. This strategic approach not only improves sound quality but also reduces the need for excessive treatment elsewhere, saving space and cost. For detailed placement tips, see this resource.
The Essential Role of Bass Traps in Small Closets
In tiny spaces, bass buildup is common. Low frequencies bounce around, creating a boomy, muddy sound. Bass traps in the corners help control these low-end issues, especially if your microphone or speakers pick up that rumble. To learn more about bass trapping, visit this guide.
Think of bass traps as the shock absorbers for sound. In a small closet, placing them in the corners where walls meet ceilings manages standing waves and prevents that annoying thump in recordings. Without proper low-frequency control, recordings can sound overly dull or boomy, making mixing and mastering difficult. Bass traps help balance the spectrum, resulting in cleaner, more accurate recordings that translate well across systems. For more on bass trapping, check out this guide.
Sealing Doors and Gaps for Quiet, Not Just Quietish
Sound leaks through gaps around doors, windows, and vents. In a closet setup, sealing these gaps is a quick win for reducing noise bleed. Use weatherstripping, acoustic sealant, or even a thick blanket over the door for a quick fix.
But why is this so effective? Because sound travels through small openings, and even tiny gaps can significantly reduce your room’s isolation. Proper sealing prevents external noise from entering and internal sound from escaping, which is especially important if you’re recording or trying to keep noise contained. For more tips on sealing your space, see this guide.
DIY Materials That Make Your Closet Sound Better
Soft, thick materials are your friends. Moving blankets, rugs, acoustic foam panels, and even thick curtains can absorb sound reflections and reduce echo. These are cheap, easy to install, and highly effective when placed correctly.
But beyond just hanging or stacking these materials, understanding their placement is key. For example, placing blankets at reflection points or directly on walls where sound bounces helps trap and diffuse reflections. Similarly, strategically positioning rugs and curtains can create a more balanced acoustic environment, minimizing both flutter echoes and low-frequency issues. Combining these DIY solutions maximizes absorption without the complexity and expense of professional treatment, making a noticeable difference in sound quality.
How to Make Your Closet Setup Practical Without Turning It into a Box
Small spaces can sound dead and feel claustrophobic. To avoid that, leave some reflective surfaces and strategic openings. Use diffusers or semi-absorbent materials that don’t deaden the sound completely.
Position your mic away from directly facing hard, flat surfaces. Keep some open space around your gear to prevent that boxy, dead sound. Also, plan your cable routing and power access carefully—nothing kills workflow faster than tangled cords or blocked outlets.
For example, mount a shelf or a small desk inside the closet that allows easy access to power strips and keeps cables tidy. Use a small fan for ventilation that doesn’t create extra noise. For detailed tips, see this article.
Frequently Asked Questions
Is acoustic foam enough for a closet studio?
Not quite. Foam helps reduce echo and reflections but doesn’t block sound leaks. For better isolation, combine foam with sealing gaps and strategic placement of absorption materials.Where should I place panels or foam in a vocal booth?
Place panels at the main reflection points—behind you, the side walls, and the ceiling. Use a mirror trick to identify these spots for the best results.Do I need bass traps in a small closet?
Yes, especially if you notice a boomy, muddy sound. Corner bass traps help control low-frequency buildup common in tiny, parallel-walled spaces.How do I stop sound leaking through the door?
Seal gaps with weatherstripping, acoustic sealant, or hang a thick blanket over the door. Small modifications like these can make a big difference.How much treatment do I need for a tiny space?
Focus on reflection points and low-frequency control first. You don’t need to cover every wall—targeted, strategic placement is more effective and less cluttered.Conclusion
Transforming a tiny closet into a quiet, functional studio isn’t about buying endless foam or sealing every crack—it's about smart placement, effective ventilation, and targeted treatment. Keep your gear in another room if possible, and focus your acoustic efforts on reflection points and leaks. That’s how you get great sound without turning your space into a box.
Remember: it’s not just about damping sound—it’s about controlling where it goes and how it moves. With a little planning, your closet can become the best-kept secret of your home studio.